Your Warehouse in Digital Form — The Warehouse Map
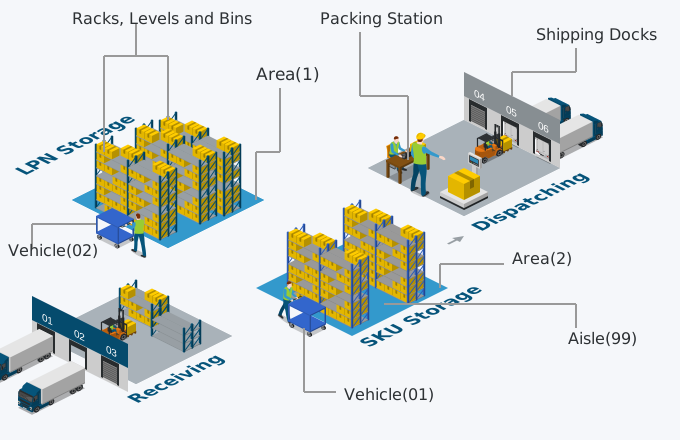
Why Location Structure Matters
Imagine walking into a warehouse without any labels, without any rack numbers, and without any logical structure. Moving goods through that space would be pure guesswork. A WMS faces exactly the same problem: without a precise, structured representation of the physical warehouse, it cannot suggest where to put incoming goods, cannot direct pickers to the right location, and cannot count inventory accurately. Setting up the warehouse map is the single most important first step in any eWAVE deployment — and every other feature in this guide depends on it being complete and correct before you begin.
The warehouse map in eWAVE is not a visual floor plan (though you can draw one yourself for reference). It is a structured database of storage positions, each with a unique identifier, a barcode, and a set of properties that control how the system uses that position. Once a location exists in the system and its barcode is printed and attached to the physical rack face, it becomes a first-class addressable object: the system knows its area, zone, function, capacity, and tracking type.
The Six-Level Hierarchy
eWAVE uses a six-level location hierarchy to model any warehouse layout, from a single storage room to a multi-zone distribution centre spanning tens of thousands of square metres. The levels, from broadest to most specific, are: Area, Zone, Aisle, Bay, Level, and Bin. Every storage position in the system is uniquely defined by its combination of these six values.
| Level | Purpose | Example Value | Typical Count |
|---|---|---|---|
| Area | Broad warehouse section (building, room, floor) | MAIN | 1–5 |
| Zone | Climate or functional zone (dry, cold, hazmat, returns) | DRY | 1–10 |
| Aisle | Rack row identifier (A–Z or A01–Z99) | A | 5–50 |
| Bay | Rack column — the upright pair number along the aisle | 05 | 5–30 per aisle |
| Level | Height position on the rack (1 = floor, 5 = top) | 3 | 3–6 |
| Bin | Individual slot within a level (L = left, R = right, or A–D) | L | 1–4 |
The system automatically computes a barcode for each location by concatenating these six values in sequence. For the example row above:
Attach that barcode label to the physical rack face, and the moment a warehouse team member scans it, the system knows the exact position down to the individual slot. The entire validation — "am I in the right place?" — happens in one scan with zero ambiguity.
Naming Convention Guidelines
A consistent, logical naming convention is critical. Once the convention is established and barcodes are printed, changing it requires reprinting all labels — so design it carefully before you begin data entry. Recommended practices:
- Area: use short (3–6 character) uppercase codes that are self-explanatory — MAIN, MZZB (mezzanine B), BULK, DOCK. Avoid numbers for area codes as they can be confused with bay or level numbers.
- Zone: climate or function codes — DRY, COLD, HAZM, RTRN (returns), XDCK (cross-dock), STAG (staging). Keep to 4–6 characters.
- Aisle: single letters (A, B, C…) work well for up to 26 aisles. For more, use two-letter or letter+digit codes (AA, AB…). Avoid the letter O (too similar to zero) and I (too similar to 1).
- Bay: always use zero-padded two-digit numbers (01, 02… 20) so that alphabetical sort equals physical sort. Single-digit bays will sort incorrectly in reports (1, 10, 11… instead of 01, 02…).
- Level: number from bottom (1) to top. Level 1 is always the floor or ground pick face. Maximum 5–6 levels for most racking systems.
- Bin: if a level has only one position, use a single code (A or 1). For multiple bins on one level, use L/R for left/right or A/B/C/D for up to four positions.
Bulk Location Import
Creating locations manually one by one would be impractical for any warehouse of significant size. eWAVE includes a bulk location import wizard that generates entire sections of the warehouse grid automatically. You specify a range for each level and the wizard creates all the permutations at once.
Example: to create the complete dry goods rack section (Aisles A through G, Bays 01 through 20, Levels 1 through 4, Bin positions L and R):
- Area: MAIN, Zone: DRY
- Aisle range: A → G (7 aisles)
- Bay range: 01 → 20 (20 bays)
- Level range: 1 → 4 (4 levels)
- Bin values: L, R
The wizard generates: 7 × 20 × 4 × 2 = 1,120 locations in a few seconds. Without the bulk import, entering each manually would take hours. The bulk import wizard also allows you to specify the default tracking type, capacity limits, and location group for the entire generated set — so you configure once, not 1,120 times.
Location Tracking Types
Each location has a tracking type that controls how inventory is stored and counted there. Choosing the right type for each area of the warehouse is one of the most important configuration decisions you will make.
SKU-Tracked Locations
The system knows which products are in the location and their total quantity, but does not necessarily track individual containers.
- Best for: forward-pick faces, flow-rack positions, bulk floor storage of fast-moving SKUs
- Multiple products can be stored in one location (though clean practice keeps one SKU per pick face)
- Replenishment triggers based on quantity threshold at the SKU level
- Cycle counts validate product quantities rather than container integrity
- Does not require an LPN scan to record inventory — quantity entry is sufficient
LPN-Tracked Locations
Each bin is assigned to a specific container (LPN). One LPN per bin. The system tracks which container is in which exact location.
- Best for: pallet racking, reserve storage, receiving staging areas, cross-dock positions
- Moving an LPN updates its location record automatically — no separate inventory update needed
- Cycle counts require scanning the LPN in the location to confirm container integrity
- Supports mixed-SKU containers — one LPN can hold many products and the system tracks all
- Required for full traceability of lot numbers, serial numbers, and expiry dates at position level
Capacity Constraints
Each location can be assigned maximum limits that the putaway algorithm respects when suggesting storage positions:
| Constraint Type | Field | When to Use |
|---|---|---|
| Maximum weight | max_weight (kg) | Always — reflects the rated load capacity of the rack beam; prevents overloading |
| Maximum volume | max_volume (m³ or cm³) | For bin locations where container dimensions matter; prevents overfilling |
| Maximum containers | max_lpn_count | For SKU locations that should hold at most N pallets or totes side by side |
The putaway algorithm will not suggest a location that would exceed any of these limits given the incoming LPN's weight, volume, or container count. Getting these values from your rack manufacturer's load tables and entering them accurately is a one-time effort that prevents overloading incidents and keeps the warehouse compliant with its rack safety certification.
Special Location Types
Beyond standard storage racks, eWAVE's location system handles several special position types that every warehouse needs:
- Receiving staging (STAG): a designated area where newly arrived LPNs sit before putaway is confirmed. The putaway algorithm directs goods out of staging after receiving is complete. Define staging positions as LPN-tracked for full container traceability.
- Quality hold (QHOLD): a quarantine area for goods that have failed inspection, are under dispute with a supplier, or require regulatory clearance before they can enter normal storage. LPNs in a QHOLD location are flagged as unavailable for picking allocation.
- Reject / returns staging (RTRN): a dedicated area for customer returns, outbound short-picks, or damaged goods awaiting disposition. Often SKU-tracked since the contents may be mixed and irregular.
- Cross-dock staging (XDCK): for goods that are received and immediately assigned to an outbound wave without being put away into reserve storage. The LPN goes from the inbound dock to the cross-dock staging position, and the picking workflow allocates from there.
- Sorting / packing (PACK): temporary positions at the packing station where picked items are staged before going into cartons. These are transient — LPNs or items move through them quickly and the locations are always cleared by end of shift.
Location Groups
Location groups are named collections of individual locations that can be treated as a single unit in configuration rules. They are particularly powerful in three contexts:
- Putaway rules (move types): instead of listing every pick-face location individually in a putaway rule, create a group called PICKLANE-DRYGOODS and reference the group. Any location added to the group later is automatically covered by the rule.
- Cycle count scoping: when scheduling a cycle count, you can target a specific group — for example, COUNT-COLDZONE — rather than having to list each cold-zone location. This makes count scheduling fast and consistent.
- Allocation restrictions: some operations want specific waves to draw inventory only from specific zones. A routing or allocation rule can restrict picking to a named location group, ensuring that high-priority orders draw from forward-pick faces only.
Maintaining the Map Over Time
A warehouse is not static. Racks are added, zones are repurposed, seasonal overflow areas come and go. Managing these changes in eWAVE requires a small but important discipline:
- Adding locations: use the bulk import wizard for new rack sections; create individual locations for special positions. Print and attach the barcode label before activating the location — scanning an unattached barcode creates phantom locations that cause picking errors.
- Deactivating locations: never delete a location that has had inventory transactions — the transaction log references it permanently. Instead, set the location's active flag to False, which removes it from putaway suggestions and count schedules while preserving the audit record.
- Changing capacity: if you install heavier-duty racking or add mezzanine levels, update the capacity figures in eWAVE before the physical change is in service — the putaway algorithm will start using the new capacity immediately.
- Renaming conventions: changing an established naming convention requires updating barcodes on all affected rack labels and updating the location records. Plan this work outside operating hours to avoid mid-shift confusion.
Key Concepts — Episode 3
- Six-level hierarchy: Area → Zone → Aisle → Bay → Level → Bin — models any warehouse layout from one room to a multi-zone DC
- Auto-computed barcodes from the six field values — print and attach to rack faces; one scan confirms exact position
- Naming convention: establish once before data entry; zero-pad bay and level numbers; avoid O and I as aisle letters
- Bulk import wizard: generate hundreds of locations from range specifications — 1,000+ locations in seconds
- SKU-tracked locations: logical inventory per product — best for pick faces and flow racking
- LPN-tracked locations: one container per bin — best for pallet racking, staging, and reserve storage
- Capacity constraints: maximum weight, volume, and container count — enforced by putaway algorithm
- Special locations: STAG, QHOLD, RTRN, XDCK, PACK — each with appropriate tracking type and rules
- Location groups: named collections for putaway rules, cycle count scoping, and allocation restrictions
- Deactivate (don't delete) retired locations to preserve the transaction audit trail